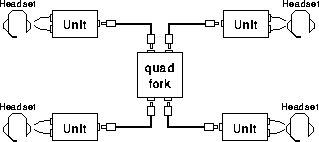
A unit is given for each pilot. Each unit consists of one 006P battery, a microphone amp, a headphone amp, and some buffers. Communication is achieved simply by connecting its COMM port parallel to other players' units.
You can obtain the entire information in this document as a tar.gz archive, including PostScript charts and tgif object files, from Here.

Here follows some tips in purchasing parts.
Any headphones suitable for your Walkman is OK for Mad-P II Unit. I recommend a headset (overhead phones with a rod microphone), if you have enough money. I myself use the cheapest mic and inner-ear type headphones---a little troublesome in putting on and off.
Parts for units.
Parts		Qty/	Qty/	@Cost in Yen
		Unit	Lance   (100yen =~ $1)
IC
  LM380N	1	 4	 160
  TL074N	1	 4	 120
Register
  Either 1/8W or 1/4W will be OK.  Choose cheaper.
  100ohm	1	 4
  560ohm	1	 4
   4.7k		1	 4	   5 for 1piece
   10k		2	 8	 200 for 100pcs
  100k		4	16
  220k		1	 4
Variable register
  2k trimmer	1	 4	  70
  50k with SW   1	 4	 170
Mylar capacitor
  0.068uF(683)	1	 4	  20
  0.1uF  (104)  2	 8	  20
Chemical capacitor
  Higher voltage will be OK, except for 470uF.
  470uF 25V is too large to fit on the board!
  1uF 16V+	1	 4	  20
  10uF 16V+	1	 4	  20
  470uF 16V	1	 4	  20
LED
  avoid automatic blinker type.
  anything	1	 4	  20	power indicator
Others
  battery snap	1	 4	  30	for 006P
  stereo jack	1	 4	  30	for headphones
  mono jack	2	 8	  30	for mic and comm
  VR knob	1	 4	  90
  case		1	 4	 500
  bolt/nut/spacer			to mount the board

Total				2000 yen per unit
Parts for connection
  mono plug		 8	  30
  mono jack		 4	  30
  case			 1	 500
  shielded cable	30m	  40/m	choose thinnest one!
A complete set for a lance costed me around 20,000yen, including 4 microphone headsets.

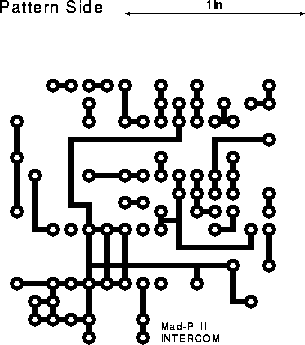
Print "pattern6.ps" with magnification 0.8. Note that the PostScript file is enlarged by 1.25 (to avoid tgif's round off error :-< ). Light-sensitive resist board is useful. You can make 6 units out of 10cm x 15cm board.

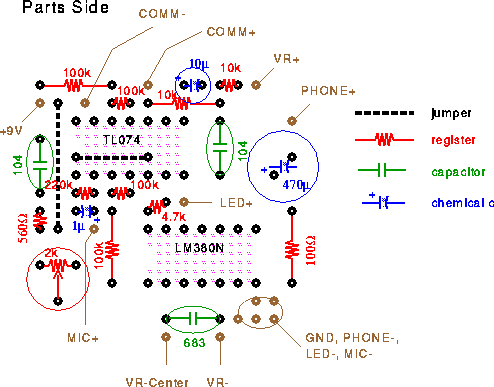
There is a jumper wire which should be put under the TL074. Be sure to connect jumper before you mount the IC.
I can finish soldering for one unit in a half hour or so. Drilling holes on the case takes longer. GIF file for my unit is available here (81kB).
When you finish soldering and checking the wiring, first test the current. First without connecting the mic nor phones. Put your tester (in DCmA mode) series between the battery and the unit. Turn on the power switch. The unit should consume 15--20mA. If the meter reads far beyond the range above, something might go wrong. If it is OK, try with mic and phones connected. Put on the phones and talk into your mic. You should hear your voice! Set the mic gain trimmer (*3 in the schematic) halfway.
When you finish two units, try a connection test. Connect the comm ports of the units each other. Turn on two units. Talk into one mic and you should be able to hear from headphones on both unit. If the voice level differ between two units so much, turn the mic gain trimmer to adjust.
Microphone amp is designed for my choice of microphone (KORG HMP-10), which has rather low sensitivity (-89db). Cut and try 220k register (*1 in the schematic) for your microphone. If the voice is too low, replace with higher one as 330k, 470k; if too loud, lower one as 120k, 51k, ...
Main volume should be used as power switch. Search for a 5P-volume. If you couldn't find 50k one, don't worry. 10k or 30k might be OK---but don't forget to choose offset 10k (*2 in the schematic) accordingly.
Put on your headphones and microphone. Plug them in to your unit. Connect your unit with your friends' units as below.

Shielded cable is recommended. Turn the power on. It needs 4 or 5 seconds to startup. There is a little blank when your friend turn the power on or off.
If you can't hear your friend when he can hear you, your battery might be running out. One 006P battery should be enough for 180 minutes or so. You shouldn't need more than one battery in a day, but I suggest that you should prepare spare batteries. If someone's battery is thoroughly run out, all of you and your friends will hear a howling noise! Be sure to replace all the batteries if it's long time (one month or so) since the last use. I always use brand-new batteries on a tourney.
You can connect one more unit to record the conversation. I made an extra unit and mounted it in the fork box. Connect the phone output to your tape recorder's Aux-input. Replace the main (50k) volume with a trimmer VR and set it suitable for your recording level.
I also set the microphone amp's gain low (replace 220k with 22k). Connect your Diskman to the mic plug and you can inject a BGM into the conversation (just a fun but not always useful).
Utilizing simultaneous intercom in team games requires some practise. You'll find yourself rather quiet if you playback the tape. Try as if muttering to yourself. After 5 games or so, you'll be able to fire and talk at the same time. Listening to your friends and cooperating would need another 5 games or so.
Please let me know when you succeed to build and use Mad-P II. Of course, feel free to ask me any question. To confess, I'm not an expert in analog circuit design at all. Actually, my friend who is good at analog design says there's some room for improvement. But it works fine! Please let me know if you have some suggestion. Good luck!
 Return to Mad Player's home page